The event you’ve been pouring your heart and soul into planning is just around the corner now.
You want it to be a massive success with happy attendees and a ‘Sold Out’ label you can proudly display.
But all that hard work will be for nothing if you can’t get people to register and attend.
Facebook advertising to the rescue! Facebook ads are an excellent way to promote your event and boost registration numbers. You have complete control over the budget and who sees your ads. However, Facebook ads can fail if the right steps aren’t taken and that’s why they often leave people feeling discouraged with the results.
I love Facebook ads and the amazing results they give me. But it hasn’t always been that way. I spent my fair share of time trying and failing with different techniques. I’ve finally found my set of tried and true strategies that always produce high conversion rates and amazing engagement.
In this guide I’m sharing my top Facebook ad secrets to help put you on the right track to boost your event registrations.
The Set-Up Process:
Before you jump right in to making your Facebook ads, you will want to start with a few preparation tasks. These tasks will improve the performance of your ads and make them more cost-effective. You don’t want to skip these.
Step 1: Set up the Facebook pixel on your website.
The Facebook pixel is a small piece of code that you add to your website. Facebook will track who goes on your website and then match them to their Facebook profile. It’s an amazing feature that lets you target Facebook ads to people who have previously visited your website! The targeting options are extremely specific. For example, if you’re trying to get more event registrations, you can target your ads to people who visited the registration page but did not complete the registration. It also makes tracking results extremely accurate because Facebook will be able to tell you if someone completed a registration after clicking through from your ad. Read Facebook’s guide on how to create a pixel here: https://www.facebook.com/business/help/952192354843755
This brings us to the next important task on the list…
Step 2: Create your Custom Audiences.
Custom Audiences are so valuable to Facebook advertising because they allow you to fine-tune your audience and spend your ad budget on people who are most likely to convert. You can create Custom Audiences out of different variables but my personal favourites are CRM database uploads and website visitors.
If you have a CRM database filled with email addresses and phone numbers, upload it to Facebook as a Custom Audience and they will match the person to their profile on Facebook! Keep in mind that not everybody uses the same email address or phone number to register on Facebook so match rates are typically in the 50-70% range. If you have a massive database of contacts that’s still hundreds or thousands of highly targeted people you can reach!
My next favourite Custom Audience are website visitors. This one only works if you’ve installed the Facebook pixel to your website. You can create a Custom Audience based on activity on your website, including creating audiences out of people who visited certain pages or who spent a lot of time on a certain page. Read Facebook’s guide on how to use Custom Audiences here: https://www.facebook.com/business/a/custom-audiences
Step 3: Create your Lookalike Audiences.
In my experience, Lookalike Audiences have been the most effective audience in terms of low cost-per-clicks and high conversion rates when targeting ads. They are an incredibly useful tool on Facebook.
You can create a Lookalike Audience using one of your Custom Audiences. Simply select a Custom Audience you have previously created and then choose a country and a percentage size (I usually select 1% for the most accurate results). Facebook will then hunt through new Facebook profiles and find people who are very similar to the people in your Custom Audiences. These are new people that have never heard of your brand or event but they are in the top 1% of people in the country who are most similar to your website visitors or CRM database! How cool is that?! Read Facebook’s guide on how to create a Lookalike Audience here: https://www.facebook.com/business/help/465262276878947?helpref=related
Planning the Facebook Ad Funnel:
When you’re advertising for an event on Facebook, it’s important that you start off by building a funnel with three stages:
1. The Awareness Stage
Your audience has little to no knowledge of you or your event at this point. You want to warm them up gently with valuable content. Don’t go straight in for the sale at this point because conversion rates will be low.
For the CHS18 campaign we recently ran, we promoted a video highlights reel of last year’s show to warm up the audience. We wanted to give them a glimpse of what CHS is all about & the excitement that surrounds it before jumping in right away and pushing them to register now.
The types of audiences you want to use at this stage are your Custom Audiences from your CRM databases and website visitors. You can also include Lookalike Audiences here and some interest targeting based on job titles or interests!
2. The Consideration Stage
At this point your audience has heard of you and has probably engaged with information about your event before. If they saw your brand name, they would most likely recognise it but they haven’t registered yet. They’re still thinking about it.
During this stage you can start pushing your benefits-driven copy. Use social proof and real testimonials in your ad text. Test out different striking images.
The audiences I select during this stage are people who have viewed at least 50% of the video in the Awareness ad and people who have visited the registration page on the website but haven’t completed registration.
3. Conversion Stage
This is your final chance to get people who have shown interest in your event to seal the deal and complete registration. During this stage I like to create a sense of urgency in my ad text encouraging people to register now before they miss out or highlighting the amount of limited spaces left. You should also continue pushing out your testimonials at this stage. (Don’t stuff all of this information in one ad! Keep it simple and create separate ads for each style of content – social proof, urgency, benefits, etc.)
Creating Your Ads:
To get people interested in registering for your event you have to first get people captivated enough to stop and look at your ad on Facebook. Considering the fact that the entire world is competing for attention on Facebook, this can be no easy feat. Luckily, I have some tried and true tips for you on writing ad copy that resonates with your audience and choosing images and videos that get their eyes on your ad.
1. Never include graphics or images that contain over 20% text.
Facebook doesn’t allow this and will not run your ad! This can be easier said than done in the events industry because most of our graphics contain some important information! Consider making graphics specifically for your Facebook ads so you know everything will be compliant with the rules.
2. Real photos of people tend to perform better (but not always!)
During your journey with Facebook ads, you should be always testing what performs best with your audience. Don’t just choose one image and run one ad and hope for the best! I always recommend having at least four ads running at once within an ad set for variation and to test what’s working best! (Note: Each ad will not cost you extra. You set the budget you want to spend at the ad set level and then you can create as many ads you want within that.)
In my personal experience using Facebook ads, I’ve always found that using images of real people attending events looking happy is the most effective. I always include some graphics at the start of my campaign to test if this is still the case. Once I start getting clicks and conversions rolling in, I investigate what images are performing the best and pause any ads that aren’t doing so well. More often than not, the images that include real faces perform the best!
3. Videos are the most engaging.
What’s even more engaging than a photo of a real event attendee looking happy? Videos!
It’s no secret that people on Facebook love video. It seems to take up most of my newsfeed 24/7!
Videos captures attention and they give off so much personality and hype that’s contagious. Videos are especially great for the Awareness stage of your campaigns where your audience doesn’t know who you are yet or what your event is about.
When promoting the upcoming Conference & Hospitality Show at CHS Group, we ran some Facebook ads to encourage people to register. I started off by pushing the highlights reel of last year’s show because it was the best and most engaging way to show off to new audiences what we’re all about!
An added benefit of using videos early on in your Facebook ad campaigns is that you can re-target the people who watched your video in future ads. For example, Facebook gives you the option to target people who watched over 50% of your video. You’ll save your ad budget for people who are genuinely interested in the event and increase the ad’s conversion rate!
4. Use benefit-driven copy and clear call to actions.
Let’s be honest, people only want to know what’s in it for them, so make it easy for them to find out! Highlight the benefits of attending your event. Tailor your ads depending on who your audience is!
For the Conference & Hospitality Show, our main attendees are either event professionals or PA’s. We don’t use the same ad copy for both audiences because they have different needs. We have ads with texts showing off the benefits of attending CHS18 based on if they’re an event professional or a PA.
Once you have your benefit-driven ad copy nailed, it’s time to include some clear and direct call-to-actions. Specifically outline what the action you want your audience to take is and encourage them to do so now. For example, the headline text for the CHS18 ads is “Get your complimentary ticket for CHS18 now.” There’s no doubt about what action to take next.
Choosing Your Ad Placement:
The placement of your ad refers to where your ad will appear when it’s displayed to your audience. When you’re in the stage of creating an ad set, Facebook will have ‘Automatic Placements’ checked off. I always recommend that you go in and select ‘Edit Placements’ so you have complete control over where your budget is being spent.
When considering where to place your ads, keep in mind how warmed up your audience is to your event or brand already. For the Awareness stage of the campaign where my audience likely has little to no knowledge of the event yet, I only display the ads in the Newsfeed. I untick every other box. Placing your ads in the Newsfeed is great because it looks the most natural to someone scrolling through. The audience will be more likely to stop and see what you’re saying about your event even if they have no idea who your brand is because your ad is sandwiched between posts from their friends and family.
Once your audience has engaged with your event more (in the Consideration and Conversion stages), I recommend that you add right sidebar ads to the mix. They stand out to an audience that already recognises your event or brand but they’re often ignored by a cold audience who doesn’t know who you are yet.
I never include ‘Audience Network’ in the placement options. Leaving ‘Audience Network’ checked off as a placement option will allow Facebook to push your ads out to websites outside of Facebook. It doesn’t give me the fine-tuned control that I look for when creating Facebook ads to control relevance and budget. They also generally have a high cost-per-click.

How To Organise Your Facebook Ads:
My final piece of advice for you is based around an issue that I was very confused about when I first started advertising on Facebook.
How do you organise Campaigns, Ad Sets and Ads? What goes in what?
Here’s how I do it and what has worked the best for me. This advice is based on the promotion of a single event.
Campaigns:
I organise by funnel stage (Awareness, Consideration, Conversion). They each get their own campaign.
Ad Sets:
I organise by audience and/or location. For example, my Website Visitors get their own ad set, my Lookalike Audience get their own ad set and my ‘Event Professionals in Yorkshire’ interest targeting would get their own ad set.
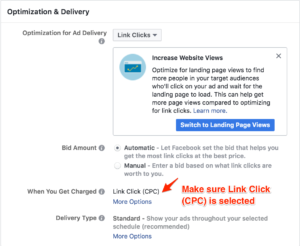
Note: Make sure you’re getting charged by Link Click instead of by Impressions!
Ads:
I make a new ad for every variation I do with images and copy.
Well, there you go! Those are my best tips to boost event registration using highly targeted ads on Facebook. As with everything, testing out different strategies is the only way to truly know what works for your brand and audience, but these are the techniques that have worked best for us at CHS.
Don’t forget to save the date for the 24th of April where we’re hosting the Conference & Hospitality Show 2018 in Leeds! It’s the perfect opportunity to fill up your little black book with 200+ venues, hotels and event suppliers. We also have some amazing speakers and educational sessions planned including our keynote speaker, Jimmy Garcia!
Get your complimentary ticket here: http://bit.ly/2FtQsee